How to Install an Electrum Server using Full Bitcoin Node and ElectrumX

In the event of a contentious hard fork and a possible coin split, user's wealth may be in danger without a proper "replay protection" being implemented. This holds true even more so when a user runs a lightweight wallet such as Electrum.
Electrum's developer Thomas Voegtlin has published a document on how to safely split coins should such event occur.
However, this method relies on 3rd party servers that the wallet connects to. In the Bitcoin world, 3rd parties should not be trusted under any circumstances.
I'll show you how to overcome this limitation by setting up your own Electrum server.
This tutorial is aimed at Mac OS X and Debian-based Linux distributions. It should work with other Linux distros too. Sorry, I don't have a Windows machine.
Before you start, make sure to install a full Bitcoin node first and set at least the following minimum options in bitcoin.conf:
server=1
listen=1
daemon=1
txindex=1
rpcuser=<random username>
rpcpassword=<strong password>
Use random string generator for rpcuser and rpcpassword. The longer, the better.
If you already have bitcoin node installed, you need to reindex the blockchain:
bitcoin-cli stop
bitcoind -reindex
When running Bitcoin-Qt it should be enough to just close and reopen the wallet. It will reindex the chain automatically.
#1 Install LevelDB
A database engine is required to store transaction information. I use leveldb only because I haven't had luck installing RocksDB.
On Mac OS X
Install leveldb using homebrew:
brew install leveldbOn Linux
If you have a Debian-based Linux distribution you can use the following command:
sudo apt-get install python3-leveldb libleveldb-devIf you don't, then you'll have to figure it out. I haven't had luck installing from source.
#2 Install Python 3
ElectrumX developer decided to use newer Python 3 which isn't installed on many operating systems by default.
Let's install it manually.
on Mac OS X
Install the latest version of Python 3 with homebrew:
brew install python3on Linux distributions
There are many different options to install Python 3.7 based on your Linux distribution.
Ubuntu (option 1)
Install the latest python 3.9 on Ubuntu:
sudo apt-get update && sudo apt-get install python3.9 python3.9-dev python3-pipOther Debian-based distro (option 2)
Some Debian-based distributions may already be shipped with the latest Python.
Let's see:
sudo apt-get install python3.9 python3.9-dev python3-pipIn a case of an error try using the following option instead.
From a source (option 3)
If you can't install it from a repository, just compile it from the source code. It should work for most distros.
cd /tmp
wget https://www.python.org/ftp/python/3.10.6/Python-3.10.6.tgz
tar xvf Python-3.10.6.tgz
cd Python-3.10.6
./configure --enable-optimizations
make -j4
sudo make altinstall
python3 --version
Please note that the compilation will take "forever".
However, if your CPU has more than 4 cores, you can speed it up a bit by using make -j8 instead.
Install required Python packages
You will also need to install some Python 3 dependencies for ElectrumX.
Let's first upgrade setuptools:
python3 -m pip install --upgrade pip setuptools wheelthen install some required packages:
python3 -m pip install --upgrade aiohttp pylru leveldb plyvel aiorpcx ecdsaIf the above command gives you an error, try installing it with sudo (try to avoid it as much as possible, though).
#3 Install and set up ElectrumX
Clone the ElectrumX code from a GitHub repository using git:
mkdir ~/source
cd ~/source
git clone https://github.com/mariodian/electrumx-no-shitcoins
cd electrumx-no-shitcoins
Run the installation script (use sudo if it doesn't work):
python3 setup.py installNext, create a data folder where the blockchain data will be stored:
Synchronizing with a Bitcoin node takes anywhere between 1-5 days depending on your hardware.
If you want to speed up the process a bit, download one of these data files and put it in the ~/.electrumx folder.
#4 Create a self-signed certificate
To allow Electrum wallets to connect to your server over SSL you need to create a self-signed certificate.
Go to the data folder:
cd ~/.electrumxand generate your key:
openssl genrsa -out server.key 2048
openssl req -new -key server.key -out server.csr
Follow the on-screen information. It will ask for certificate details such as your country and password. You can leave those fields empty.
When done, create a certificate:
openssl x509 -req -days 1825 -in server.csr -signkey server.key -out server.crtThese commands will create 2 files: server.key and server.crt.
When configuring the ElectrumX instance, make sure to add server.key to SSL_KEYFILE and server.crt to SSL_CERTFILE. More on this in the next step.
#5 Launch ElectrumX as service
First, make sure a fully validating Bitcoin node is running:
bitcoin-cli getinfoIt should output information about your node such as block height, open connections etc.
If it doesn't, run the node first.
on OS X
OS X lacks Systemd to manage system services, so we will use UNIX's default svscan instead.
Create a service folder that will hold symlinks to ElectrumX scripts.
mkdir ~/serviceCopy daemontools scripts from the GitHub repo to your home directory:
mkdir -p ~/scripts/electrumx
cp -R ~/source/electrumx/contrib/daemontools/ ~/scripts/electrumx
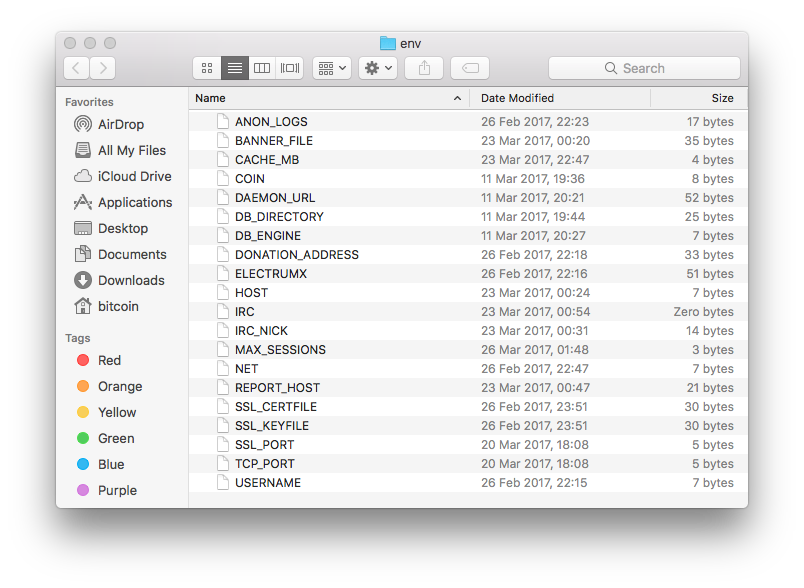
Set up ENV variables within ~/scripts/electrumx/env folder. Each variable is located in a separate file.

Please refer to ElectrumX's documentation or have a look at my settings and change it accordingly.
When finished open the log/run file:
vim ~/scripts/electrumx/log/runand edit the log path. In my case it is /Users/bitcoin/ElectrumX/logs, yours may be different.
Save the file by pressing ESC and typing :wqa followed by ENTER.
Change the permissions for the file so it can be executed:
chmod +x ~/scripts/electrumx/log/runAlso, change the permission for another file that executes the server:
chmod +x ~/scripts/electrumx/runInitialize svscan process to monitor electrumx services:
svscan ~/service & disownAdd services to the folder:
cd ~/service
ln -s ~/scripts/electrumx electrumx
They should be immediately recognized by svscan.
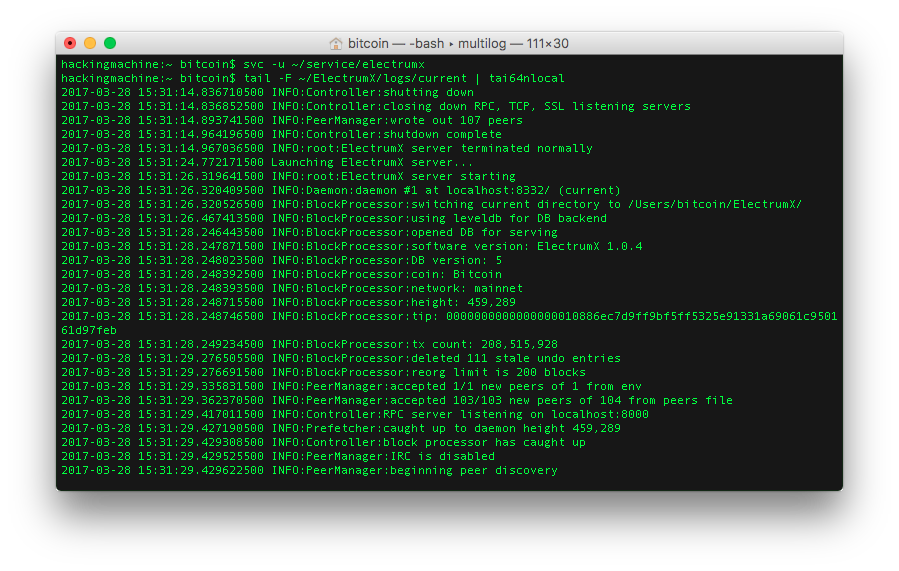
Check the last few lines of the log to see whether the service outputs any errors:
tail -F ~/.electrumx/logs/current | tai64nlocal
If it does, check your configuration again. Errors are pretty self-explanatory but if you're stuck, let me know in the comments section below.
ElectrumX is very resource intensive when it comes to open files so it needs a higher limit:
ulimit -n 10000Check that it worked:
ulimit -a | grep 'open files'Make sure the limit is set after every restart:
echo "ulimit -n 10000" >> ~/.bash_profileIf the above method doesn't work, try the following:
sudo launchctl limit maxfiles 10000 unlimitedRestart the service for new changes to take effect.
Stop the service:
svc -d ~/service/electrumxAlways wait for the service to be terminated properly by checking with logs.
Start the service again:
svc -u ~/service/electrumxAbove commands will only execute when svscan is already initialized. You can check the service's status with:
svstat ~/service/electrumxon Linux
Most if not all Debian-based distribution use Systemd by default. Make sure that is the case for your system:
sudo stat /proc/1/exe | grep systemdIf it outputs something like File: '/proc/1/exe' -> '/lib/systemd/systemd' you're good to go.
Open a sudo session and copy a service file from the ElectrumX repo to your Systemd directory:
sudo -s
cp ~/source/electrumx/contrib/systemd/electrumx.service /lib/systemd/system/
Edit the file to match your setup:
vim /lib/systemd/system/electrumx.servicePress i and start editing.
You need to edit at least ExecStart and User variables.
ExecStart=/home/bitcoin/source/electrumx/electrumx_server
User=bitcoin
When you're happy with the changes, hit ESC and type :wqa followed by ENTER.
Create a configuration file for the server:
touch /etc/electrumx.conf
vim /etc/electrumx.conf
and configure it according to your environment.
Please refer to ElectrumX's documentation or have a look at my settings.
Start the service:
systemctl start electrumxand check the output:
journalctl -u bitcoin -fIf it gives you no errors, enable the service:
systemctl enable electrumxYou can exit the sudo session now:
exit#6 Set up a Banner file
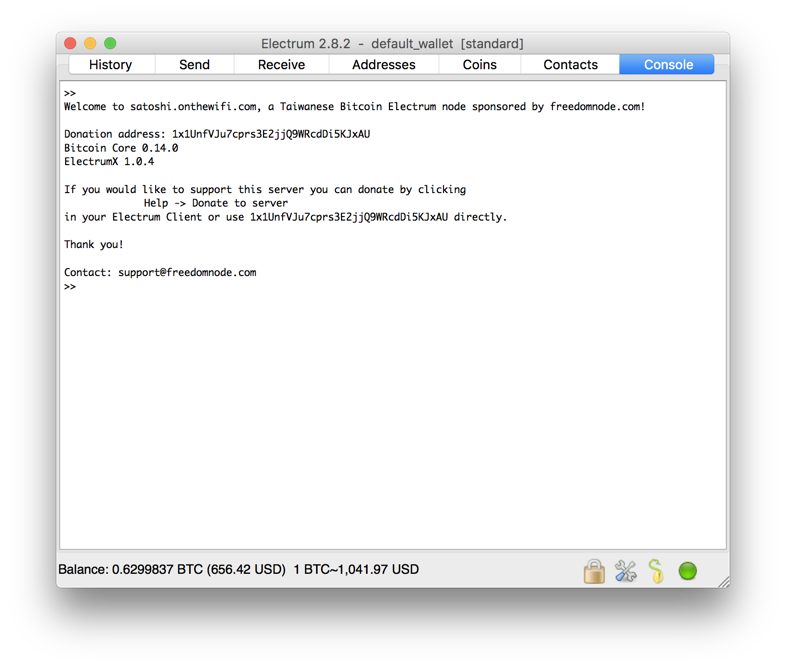
Say hi to connecting Electrum wallets (via Electrum console) using a banner file.
It may contain any information such as your server version, donation address, contacts and even info on other services you offer. It's purely up to you.

The content of my banner.txt file looks like this:
Welcome to electrum.onthewifi.com, a Taiwanese Bitcoin Electrum node sponsored by freedomnode.com!
Donation address: $DONATION_ADDRESS
Bitcoin Core $DAEMON_VERSION
$VERSION
If you would like to support this server you can donate by clicking
Help -> Donate to server
in your Electrum Client or use $DONATION_ADDRESS directly.
Thank you!
Contact: [email protected]
and is located in the data folder ~/electrumx.
You can save it to any location and let ElectrumX know via BANNER_FILE variable in either env/ folder or /etc/electrumx.conf depending on your operating system.
Don't forget to restart the server after changing any server's settings.

#7 Accept incoming connections
If you want to help the network and let others connect to your server, you have to open specific TCP ports.
For a default Electrum set up, those ports are 50001 and 50002.
On Linux, this can be easily done via iptables:
sudo iptables -A INPUT -p tcp --dport 50001 -j ACCEPT
sudo iptables -A INPUT -p tcp --dport 50002 -j ACCEPT
However, Mac OS X users will need to install some kind of firewall. The built-in one only manages outgoing connections.
There are a few options such as Little Snitch but none of them are free to my knowledge. If you know about one, please let me know.
Also, don't forget to open ports on your router if applicable. There are too many routers to cover them in this tutorial. Sorry.
To test the connection, open your Electrum wallet. Start it with an argument --oneserver for extra privacy.
On Mac OS X the command is:
open -a /Applications/Electrum.app --args --oneserverOn Linux:
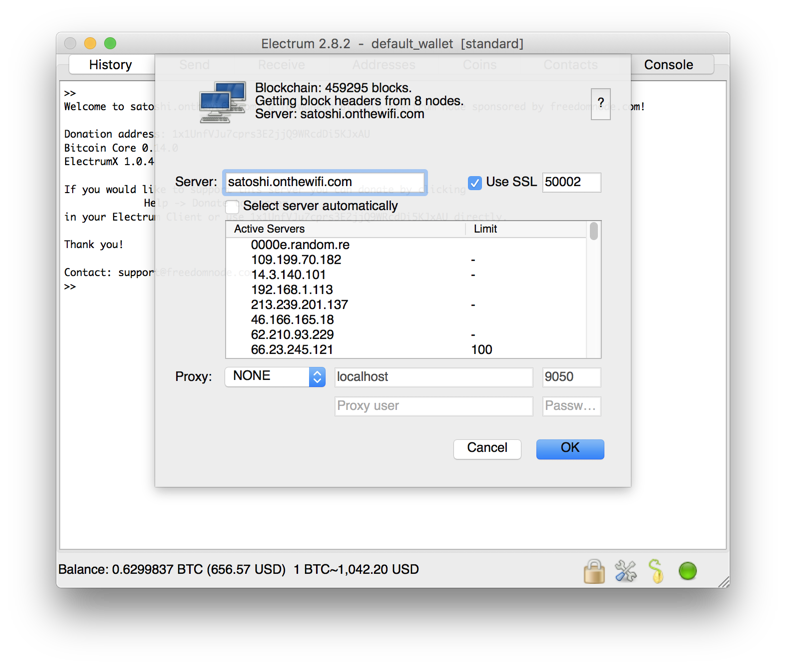
electrum --oneserverClick a green/red dot in the bottom right corner. A server configuration will pop up.

Unclick "Select server automatically" and type in your server's local/remote IP address or a hostname. Click "Use SSL" and confirm.
If you did everything right, your wallet should start synchronizing the chain data immediately. It shouldn't take more than 10 seconds to finish.
Congratulations! You no longer rely on "trusted" 3rd parties. You also made yourself protected from contentious hard forks and coin splits.
My big thank you goes to Mashuri Clark that gave me some useful tips and corrected some steps for the OS X part.


