How to Install and Use the Lightning Network with bitcoind on the Bitcoin Mainnet

Lightning Network is a system of smart contracts on top of the Bitcoin's blockchain.
It aims to solve scalability, provides instant payments with zero double spend risk and cheap transactions.
These properties enable new use cases such as decentralized exchange markets via cross-chain atomic swaps and more.
However, Lightning Network is a new protocol with a steep learning curve and it will take a while before new easy to use applications appear.
In the meantime, let's have a look at how to set up a node from scratch and make a simple payment.
If you want to learn more about the Lightning Network, have a look at the following video where Thaddeus Dryja explains it in details.
For the purpose of the tutorial, I'll be using Ubuntu 17.04 but these steps should work on most Debian-based distributions.
#1 Install Go lang and dependencies
If you haven't done so already, install Go 1.12 binaries (currently no package available):
cd /tmp
wget https://dl.google.com/go/go1.13.3.linux-amd64.tar.gz
tar -xvf go1.13.3.linux-amd64.tar.gz
sudo mv go /usr/local
Create a folder that will hold all Go apps:
mkdir ~/goExport Go paths:
echo "export GOPATH=~/go" >> ~/.bashrc
echo "export PATH=$GOPATH/bin:/usr/local/go/bin:$PATH" >> ~/.bashrc
source ~/.bashrc
Check that Go is installed properly and the path is recognized:
go versionThe output should be go version go1.10 linux/amd64.
#2 Install LND
Next, run the series of commands to install LND from source:
git clone https://github.com/lightningnetwork/lnd $GOPATH/src/github.com/lightningnetwork/lnd
cd $GOPATH/src/github.com/lightningnetwork/lnd
make && make install
To update LND in the future run these commands instead:
cd $GOPATH/src/github.com/lightningnetwork/lnd
git pull
make clean
make && make install
#3 Configure LND
It's important that you create your own Lightning Network configuration.
Start by creating the config file:
mkdir ~/.lnd && cd ~/.lnd
touch lnd.conf
Open the config file in an editor of your choice and add the following lines:
debuglevel=info
listen=your.ip.add.ress
externalip=your.ip.add.ress
alias=A name for your node
color=#000000
maxpendingchannels=5
bitcoin.mainnet=1
bitcoin.active=1
bitcoin.node=bitcoind
bitcoind.rpcuser=bitcoind_rpc_user_string
bitcoind.rpcpass=bitcoind_rpc_password_string
bitcoind.zmqpubrawblock=tcp://127.0.0.1:18501
bitcoind.zmqpubrawtx=tcp://127.0.0.1:18502
Make sure that listen, externalip, bitcoind.rpcuser and bitcoind.rpcpass match your environment.
#4 Configure bitcoind
If you haven't done so, install bitcoind first.
Alternatively, you can compile it from source with the ZeroMQ support. The article is written for Raspberry Pi3 but could work on most debian-based distributions.
Once your full bitcoin node is set up make sure ~/.bitcoin/bitcoin.conf contains this minimal configuration:
server=1
listen=1
daemon=1
txindex=1
rpcuser=bitcoind_rpc_user_string
rpcpassword=bitcoind_rpc_password_string
zmqpubrawblock=tcp://127.0.0.1:18501
zmqpubrawtx=tcp://127.0.0.1:18502
Run the node.
#5 Make LND accessible from the outside world
Allow TCP and UDP traffic on port 9735:
sudo iptables -A INPUT -p tcp --dport 9735 -j ACCEPT
sudo iptables -A INPUT -p udp --dport 9735 -j ACCEPT
and permanently save your settings:
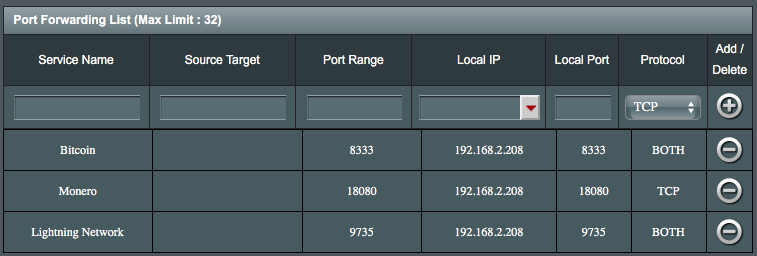
sudo iptables-saveIf your machine is behind a router, you will also have to forward ports to it.

Each router is different so you will have to figure it out on your own. Generally, you will want to look for Port Forwarding/Virtual Server settings under WAN.
#6 Setup LND as service
This step is kind of tricky since it's recommended to encrypt your lightning walletwith a password. Thus, lnd can't be started automatically after the system restart because your interaction is needed.
However, I like to manage daemons with Systemd so I still wrote a service script for it.
cd /lib/systemd/system
sudo wget https://gist.githubusercontent.com/mariodian/f766645710c1f6922c429f751869e744/raw/56c82bae3bdf727d82db6f82ba22e717623510f9/lnd.service
Make sure to edit the following script's variables to match your environment: ExecStart, ExecStop, PIDFile, User, Group.
sudo systemctl enable lndLet's create a script that starts the daemon and prompts for lightning wallet password.
mkdir ~/bin
cd ~/bin
wget https://gist.githubusercontent.com/mariodian/a6362f8a6deb15e929e9ad0b56287969/raw/90c2943a5958e57fb22b59848fcd9035b253e355/lnd.sh
chmod u+x lnd.sh
#7 Create certificate (optional)
It's important to create a custom certificate if you plan on connecting to your node remotely.
You will need to add DNS/IP entry of your server.
If your ISP provides you with a static IP you can move right into the certificate creation part.
Otherwise, you'll have to create a Dynamic DNS record. There are many free providers such as noip.com or dynu.com that let you create one.
To create the certificate execute the following commands:
cd ~/.lnd
openssl ecparam -genkey -name prime256v1 -out tls.key
openssl req -new -sha256 \
            -key tls.key \
            -subj "/CN=localhost/O=lnd" \
            -reqexts SAN \
            -config <(cat /etc/ssl/openssl.cnf \
                <(printf "\n[SAN]\nsubjectAltName=\
                     DNS:localhost,\
                     DNS:your.dynamic.dns,\ # Edit
                     IP:your.server.ip.address\ # Edit
                 ")) \
            -out csr.csr
openssl req -in csr.csr -text -noout
openssl req -x509 -sha256 -days 36500 \
            -key tls.key \
            -in csr.csr -out tls.cert \
            -extensions SAN \
            -config <(cat /etc/ssl/openssl.cnf \
                <(printf "\n[SAN]\nsubjectAltName=\
                     DNS:localhost,\
                     DNS:your.dynamic.dns,\ # Edit
                     IP:your.server.ip.address\ # Edit
                 "))
openssl x509 -in tls.cert -text -noout
Don't forget to change DNS and IP part according to your network.
The above command will create 3 files: csr.csr, tls.cert and tls.key.
In order to connect to the node remotely, you will have to copy tls.cert to the client machine and point to the file from a lightning wallet such as Zap.

#8 Run LND
Don't run lnd with the above script yet because you'll need to create a lightning walletfirst.
Instead, run lnd with the standard service command:
sudo service lnd start &Next, create the wallet and follow the on-screen instructions:
lncli createYou will have to set up a wallet password and write down the wallet's mnemonic seed(important!).
When finished stop the lightning daemon:
sudo service lnd stopNow that you have created the wallet you can use the above start/stop script to start lnd and unlock the wallet (you'll be prompted for the password):
~/bin/lnd.sh startSimilarly, you can stop lnd:
~/bin/lnd.sh stop#8 Send bitcoins to the Lightning wallet
You will have to fund your Lightning wallet before you can start using the Lightning Network.
Create a new address:
lncli newaddress p2wkhSend bitcoins to the address and wait for the network confirmation (usually around 10 minutes).
Check the wallet balance:
lncli walletbalanceand proceed to the next step if confirmed_balance is of a non-zero value.
#9 Open a channel
Go to the Lightning Network Search and Analysis Engine and choose a random node to open a channel with:
lncli connect <channel pubkey>@<channel ip address>:<channel port>
lncli openchannel <channel pubkey> --local_amt=<amt in satoshi that you commit to>
Alternatively, you can open a channel with our node:
lncli connect 03d648c5a899ce1dca6777a670467d2fdcebb510617efbf1d756b2a68fd076a65f@kqfws5swg3eyi7zolwfhpoqqyvcmxx3k6blu5geqb7baaga4ih4p5tyd.onion:9735
lncli openchannel 03d648c5a899ce1dca6777a670467d2fdcebb510617efbf1d756b2a68fd076a65f --local_amt=1000000
If you get a "connection error" the node is either offline or the initial node discovery have failed.
You can check for potential errors with this command:
tail -f ~/.lnd/logs/bitcoin/mainnet/lnd.logIn the case of DNS SEED errors, you will have to manually establish connections to well-connected nodes first:
lncli connect 031feee8045899c658eec2b6f2f6da6e4bdd7baabdc61bdc017761577342fbd011@76.184.81.28:9735
lncli connect 02ad6fb8d693dc1e4569bcedefadf5f72a931ae027dc0f0c544b34c1c6f3b9a02b@167.99.50.31:9735
lncli connect 0207481a19a3f51a48f134e95afa67cfeffdb38a99b5ad3494a320c4918aaaf579@163.172.174.151:9735
Wait a bit and try to open the channel again.
The channel opening needs to be confirmed on the Bitcoin network first. It will show as pending in the meantime:
lncli pendingchannels#10 Make a Lightning Network payment
To make a quick test payment, head over to Y'alls and click the lightning bolt icon to generate a payment request.

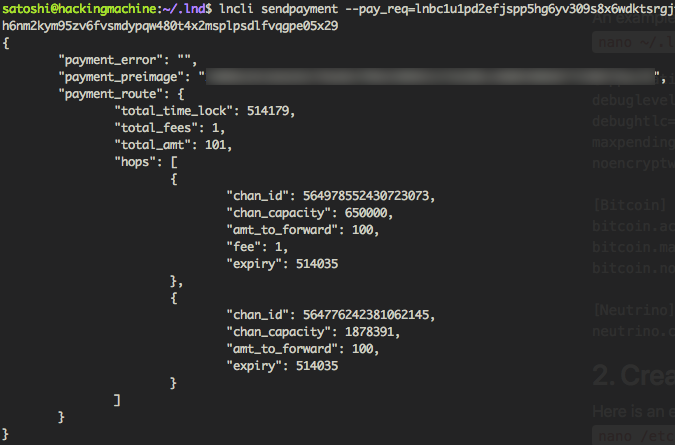
Copy the payment address and go back to the console. In my case it is:
lncli sendpayment --pay_req=lnbc1u1pd2efjspp5hg6yv309s8x6wdktsrgjtxskvdp792f9zrp7mv9mwrqp4ce89gksdz22fjkzepqg9e8g6trd3jn5gzjw4hxu6twvusyc6t8dp6xu6t8dp6zqnn9w3mk7untypzxzetdducqzysgsmwrsalmqymptmtl02u7kznlv5ga5cvdgz2d0wzpqjfeqq7t6yseklqevy9xdh6nm2kym95zv6fvsmdypqw480t4x2msplpsdlfvqgpe05x29The payment should be processed within a second or so.

You can also specify the amount yourself:
lncli sendpayment --pay_req=<payment request> --amt=<amount in satoshi>Conclusion
As you can see it's not that difficult for an average Linux user to set up and use the Lightning Network.
Having said that, Lightning Network is still a long way to go before it can hit the mainstream. The protocol only entered beta phase recently and more tools will need to be developed for it to be useful for an average Joe.
Fortunately, there are at least 4 independent teams working on easy to use GUI wallets: lightning-app, Zap, Eclair, HTLC.me.
For more info, head over to the Lightning App Directory.


